My first foray into IBM Internet of Things Foundation (part 2)

In part 1 of this series, I setup an environment where a Python application running on a Raspberry Pi, collected temperature, humidity and soil moisture data from connected barometer and moisture sensors.  This data was published to an MQTT message broker then retrieved by an application hosted on IBM Bluemix.  This application stored the data in a Cloudant database for later visualization via an HTML5 application. 

There are many different types of MQTT brokers available given it is an open source protocol.  These brokers vary by feature sets provided, some of which are in addition to the standard MQTT functionality.  IBM’s IoT Foundation, now known as Watson IoT Platform, serves as an managed and secure MQTT broker and much more.  With the Watson IoT Platform, you have a fully managed IoT platform allowing secure connection of devices with further access to a scalable platform as a service environment and a plethora of other services such as storage and analytics.

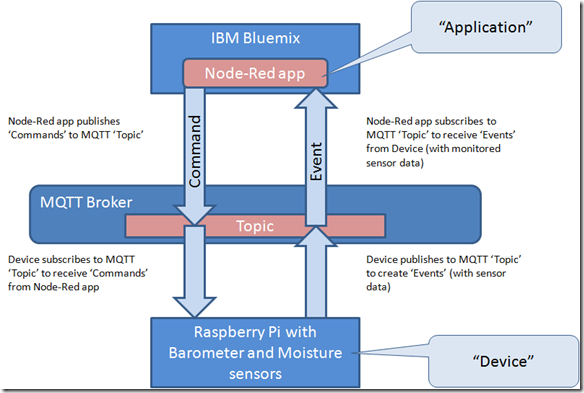
The diagram below provides a simple depiction of the interactions between a ‘Device’ and ‘Application’ through an MQTT Broker.  In part 1, I used an open source MQTT Broker.  In part 2, I will be using IBM Watson IoT platform as the MQTT Broker.  In my environment, I am only publishing ‘Events’ to the MQTT Broker for action by the Node-Red app.  I am not currently publishing ‘Commands’ back to the Raspberry Pi device.

image

My goal then for this next step in the series is to modify the Poseidon Client (Python application running on Raspberry Pi) to publish events to Watson IoT Platform and change the application running on Bluemix to receive that published data from the new source.  In this entry, I will outline the changes to each of these applications.

Before making any application modifications, I first need to configure the Pi to connect to the Watson IoT Platform using this recipe. At a high level, this recipe had me do the following:

  1. Download, install and start the IoT service which would manage the connection and publish events to the IBM IoT Foundation Quickstart.
  2. Register my Raspberry Pi device in Watson IoT Platform following another recipe.
  3. Use the credentials provided by the registration process to connect the device to Watson IoT.

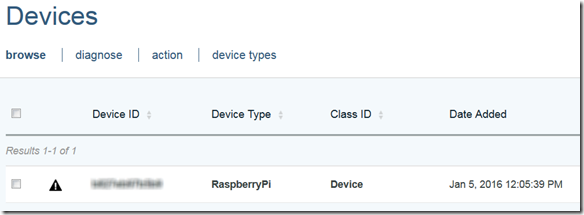
When complete, I had a device registered with the IBM Watson IoT Platform as shown below.  In the process I was provided a device ID and authentication token, to be used later when connecting the device to the Watson IoT Platform service.

image

Now I am set to modify the application code to publish events directly to Watson IoT Platform using the IoT service now running on my Raspberry Pi.  I will keep the existing code that is using the paho MQTT client libraries to publish to an open source MQTT broker.  This code is gated by a configuration parameter that I will just turn off so it no longer executes.  I will add new code and configuration parameters to use the Watson IoT Platform Device API to publish events to the Watson IoT Platform.

The config.py file contains a number of configuration parameters for the Poseidon Client.  Set ‘sendToCloud’ to ‘False’ in order to turn off sending data through the open source MQTT broker.  Add a new ‘sendToIoTF’ parameter and set it to ‘True’ to publish via the Watson IoT Platform.

image

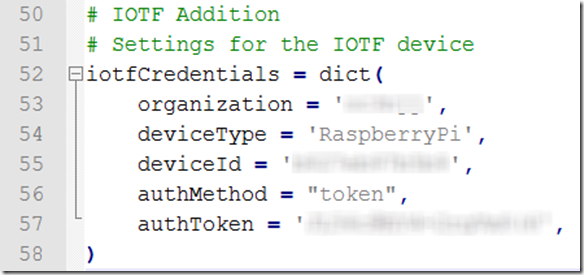
In the config.py file add a parameter to capture the credentials used to connect to the Raspberry Pi device I registered earlier.

image

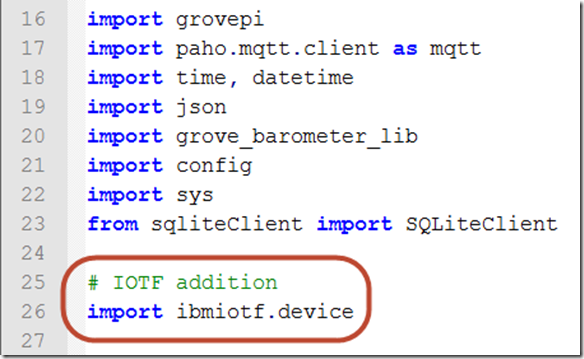
In the PoseidonClient.py code add the requisite import statement to utilize the Watson IoT Platform Device API.

image

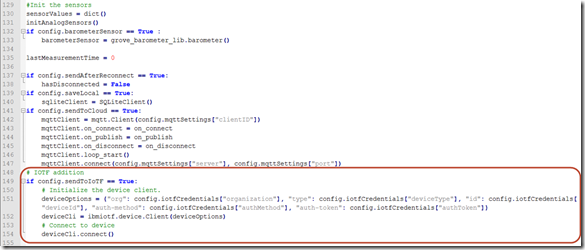
Skip ahead in PoseidonClient.py to the section of code that initializes the sensors and device interfaces.  The new code below creates a device client instance using the credentials added  to confg.py then connects to it.

image

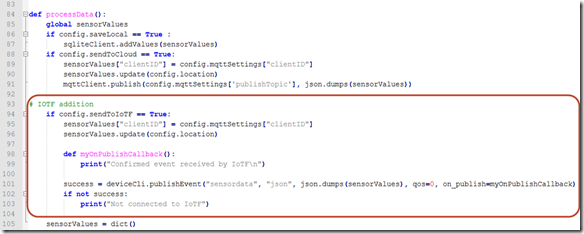
Go back in PoseidonClient.py to the processData code and a publishEvent call (with appropriate callback) to send the sensor data to the Waston IoT Platform to be read later by the application running in Bluemix.

image

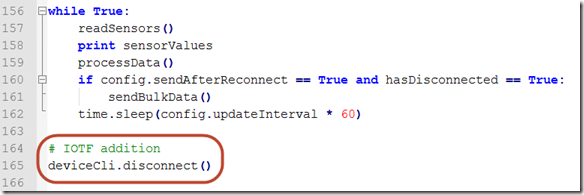
At the end of the main processing loop, add a call to disconnect from the device client instance.

image

Now we move on to the application in Bluemix.  Here is how it looked at the end of part 1.

image

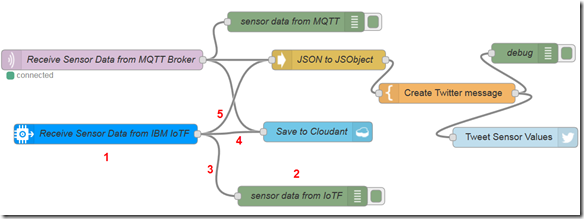
Use the Node-Red editor to add the following nodes and connections.

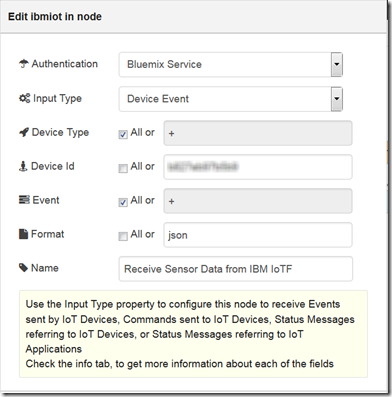
  1. Add an ibmiot input node and configure it to read events published by the Raspberry Pi device (see subsequent screen capture with showing the parameters for the node)
  2. Add a debug node to capture the data received from the device
  3. Connect the ibmiot input node to the debug node
  4. Connect the ibmiot input node to the existing Cloudant output storage node
  5. Connect the ibmiot input node to the existing json function node to transform the sensor data payload from json format to Javascript object.

image

This screen capture illustrates the parameter settings for the new ibmiot input node.

image

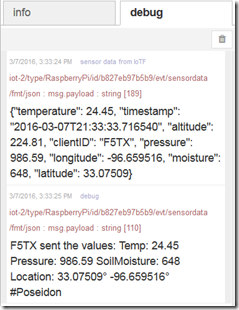
After making the above changes, running the PoseideonClient on the device and the Node-Red app in Bluemix caused the following debug output in the Node-Red debug console.

image

The first debug output is the sensor data coming in from the Watson IoT Platform.  The next debug output is the formatted message being sent to Twitter.

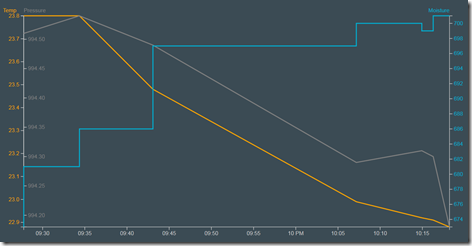
Nothing changed in the Cloudant queries and views nor the HTML5 app.  From part 1 of this series, these will produce a visualization similar to the following:

image

I have successfully altered the device to publish events to the managed IBM Watson IoT platform MQTT Broker and the Node-Red app in Bluemix to receive and process those events.  Next up for me is to investigate possible inclusion of the IBM IoT Real-Time Insights service on Bluemix or perhaps Watson Analytics.  Another area of interest is the currently experimental IBM IoT Workbench.

My first foray into IBM Internet of Things Foundation

For the last year, I have been a part of what is now the IBM Watson Internet of Things (IoT) business unit.  I’m still in the same role but have just been working with a different set of customers and interested in a solution that addressed their Continuous Engineering (CE) needs.  This solution is only one aspect of the overall IBM Internet of Things solution.  When you consider the broader IoT solution, it involves not just the designing and engineering of ‘things’ (using our CE solution) but the operation/management of them, the collection/control of data from them and the analysis/optimization of that data with all of that being cloud enabled and done in a secure manner.

Since I like to learn new things and since my solution focus is a part of a broader solution I was less familiar with, I decided to begin exploring one foundational element of it, namely the IoT Foundation.

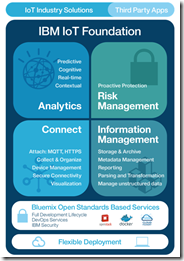
image

“The IBM IoT Foundation platform allows organizations to securely and easily connect devices, from chips to intelligent appliances to applications and industry solutions. Scaling through cloud-based services and using rich analytics, IoT Foundation platform provides organizations with new insight for innovation and transformation.”


The next question was how best to get that experience.  My colleague Dennis Schultz, who has written a nice series of blogs on My Internet of Things and MobileFirst adventure advised that I decide on a project that was practical, real and of interest to me.  At first I thought of something related to a weather station but then I thought it would be cool to do something that helped me figure out when to water my yard.  You see, I live in Texas and as I was considering this, it was in the middle of summer and our typical water restrictions were in effect such that I couldn’t always water when it was needed.  I also don’t want to over water so on my day of the week to water, I would typically stick my finger in the soil to see how wet the soil was and decide whether to turn the sprinklers on or not.  Wouldn’t it be nice if I could some how do that with a sensor that would let me know that through some sort of email, text or other mobile alert?

As I searched around, I found that some IBMers have already done some investigation along those lines.  The Poseidon Project, led by a team in Europe, “is a voluntary initiative that aims to reduce water usage in the world”.  They created a great three part tutorial series that connects a Raspberry Pi with sensors to monitor temperature and soil moisture, have that data published to an MQTT Message Broker, then input it to an application hosted on IBM Bluemix built using a Node-Red editor.  This application tweets the sensor data and also stores it in a Cloudant database for later visualization through an HTML5 app.  This appeared to have much of what I needed and more and would provide a nice launching point for my project.  Take a look at the solution architecture below.

Diagram of the solution design

I didn’t want to just jump in and follow the tutorial.  I first wanted to do some background reading and get some basic experience with the IBM IoT Foundation on Bluemix.

As you could imagine, there is a plethora of background information online.  Here are some links I found useful:

To get started with IBM IoT Foundation on Bluemix, I found there is a growing number of recipes on IBM developerWorks.  These are step by step tutorials that walk you through some aspect of using the technology of interest to you.  In particular, I followed the recipe that used a simulated device to provide temperature and humidity data that I could visualize using a simple quickstart web app (which can take inputs from real devices too).  From there I tried the IoT starter application which allowed me to feed the simulated sensor data into IoT Foundation application using a Node-Red editor in Bluemix.  I found this all to be quite fun and informative.

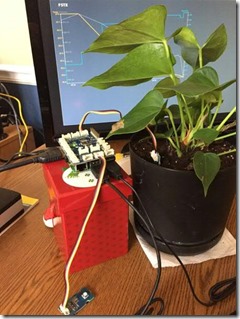
Thus armed and dangerous with some background information and basic experience I charged ahead into the Poseidon Project tutorial. My setup is depicted below.

$7B01FE0F3C44879

The specific hardware I purchased included:

The tutorial is well written and I pretty well followed it verbatim. To keep it impervious to changes in the Bluemix user interface, some of the steps were written more general with fewer specific screenshots or navigation steps making some harder, but only minimally so, for new users like me to follow. I did find that several steps were missing in Part 3, Step 2 relating to creating the APIs to be used by the HTML5 visualization app.  The authors intend to submit an update with the missing steps.  Should you decide to follow the tutorial, if it doesn’t show a revision date since it’s original publication of 16-December-2014, check back with me for the missing steps.

Here’s one output from the visualization app.

image

My experiment isn’t ready to be taken out of doors and used to monitor the soil moisture of my yard, I’d have to weatherproof the setup and find a different moisture sensor as I subsequently found that the one I am using isn’t meant to be used outdoors nor prolonged time in soil.  Still, I enjoyed the experience and believe with a little more work it could be applied as I intended.

It also gave me broad exposure to a number of different technologies enabling rapid development of IoT applications.

  • IBM Bluemix
  • Node.js
  • Node-Red
  • MQTT
  • IBM IoT Foundation
  • Cloudant DB
  • IBM DevOps Services
  • Git
  • Twitter
  • Data Drive Documents
  • HTML5

There are a couple of extensions to the tutorial I’d like to do.  First, it was written so that the sensor data is published to an MQTT Message Broker then received by the IoT Foundation app on Bluemix.  I want to instead publish the data directly to the IBM IoT Foundation using the ibmiotf client library.  I am currently working on that.  Second, I’d like to explore making use of the IBM IoT Real-Time Insights service on Bluemix.  I’ll publish any work on these in a subsequent post.

Thinking beyond this project, another idea I’m thinking of is making use of the TI SensorTag and Estimote Beacons to monitor temperatures in my home at the thermostat and in areas seemingly hotter/colder, compare these to weather outdoors and visualize on a mobile device with an app built using the IBM MobileFirst Platform or perhaps use the MyWeatherCenter app.

Finally, I will close with a thanks to Bram Havers and Davy Vanherbergen who helped me with any issues I came across in the Poseidon Client tutorial.